
Page 11 - MFW March 2024
P. 11
The problem is that you have to program the code into the
Arduino. And you require a programmer to do this, plus a
bit of patience, sometimes, as Windows does not always
co-operate!
I won’t repeat how to do this, as it well covered at the
Mode-Zero and Single-Channel websites.
Phil Greens email address is philg@talk21.com The
software code, and the 18 page manual for the DIY
Arduino encoder are here ;
https://mode-zero.uk/viewtopic.php?f=24&t=609
One problem you will soon note is that the 2 modules are
so small that there are no mounting holes, so, you must
The transmitter is the DSMP DIY module at USD 28.30. mount the modules on the plastic case using double-sided
You will also need as many receivers as you wish, the 6 foam tape. The cheap stationary or hardware store stuff is
channel one is USD 12.90 and the 7 channel one is USD no good, and will fall off in a few days. The correct tape to
15.90. us is the incredibly sticky (and quite pricey) VHB black
tape by 3M, from Bunnings. The packet holds much more
One thing to note is that Lemon explicitly state you must than you need, but it will also be superb for mounting
NOT apply power to the transmitter module with the aerial servos reliably.
disconnected, otherwise damage will occur. The 2.4 GHz
antenna, take care the coax and connector are small and Mike has written an excellent 18 page manual for the
a bit delicate. Arduino encoder. And there are many user options for
setting it up. However it can be as simple as you like. But,
A battery connector for a 2S LiPo battery, the small JST please just spend some time carefully reading his manual!
connectors are perfect. And needless to say, you need a very small iron, fine
solder, a steady hand and a magnifying glass is a big help.
And then, with a little bit of care and luck, it will work that’s
when the fun starts. The encoder does offer left, right,
kick-up elevator and motor speed control, but, timing of
button pushes takes some practice, it gets easier after 15
hours mins of practice. It goes like this....
• Push the button and hold gives Right
• Two pushes and hold gives Left
• Three pushes and hold gives kick-up elevator
• Each “quick Blip” by itself cycles the motor speed
through this sequence ... fast / med / slow-off,
then … fast / med ..... etc again.
• As a safety matter, it’s required to hold the push-
button down for 5 seconds to initially start the motor
(It always starts up at full speed)
I very strongly suggest you start with the basics, say just
rudder and motor. There are many programming options,
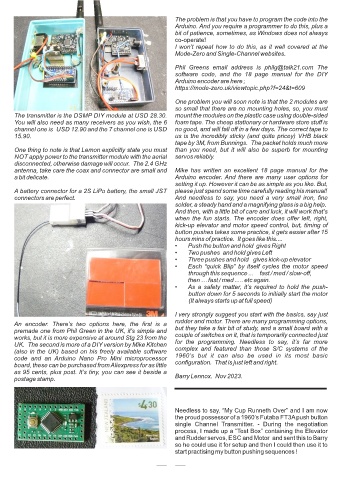
An encoder. There’s two options here, the first is a
premade one from Phil Green in the UK, it’s simple and but they take a fair bit of study, and a small board with a
works, but it is more expensive at around Stg 23 from the couple of switches on it, that is temporarily connected just
UK. The second is more of a DIY version by Mike Kitchen for the programming. Needless to say, it’s far more
(also in the UK) based on his freely available software complex and featured than those S/C systems of the
code and an Arduino Nano Pro Mini microprocessor 1960’s but it can also be used in its most basic
board, these can be purchased from Aliexpress for as little configuration. That is just left and right.
as 95 cents, plus post. It’s tiny, you can see it beside a
postage stamp. Barry Lennox. Nov 2023.
Needless to say, “My Cup Runneth Over” and I am now
the proud possessor of a 1960’s Futaba FT3A push button
single Channel Transmitter. - During the negotiation
process, I made up a “Test Box” containing the Elevator
and Rudder servos, ESC and Motor and sent this to Barry
so he could use it for setup and then I could then use it to
start practising my button pushing sequences !
10